Starting A Lifestyle Blog: Step By Step Guide For 2024
Have you been longing to turn your greatest passion into a profitable venture? Starting a lifestyle blog offers an avenue to showcase your interests, influence others, and generate passive income. In today’s digital landscape, the potential for success as a lifestyle blogger has never been greater. With the right approach, you can unlock a world of opportunities, from brand partnerships to financial freedom. Starting a lifestyle blog is a great way to make passive income, become an influencer, help people and more. Profitable blogging is possible, but there’s some work that you’ll need to put into it to succeed.
What is your greatest passion in life? Travelling? Fitness? Food?
According to Forbes, lifestyle bloggers make $5,000 a month on average! With channels like TikTok and Instagram offering even more opportunity to showcase your lifestyle and profit from it, becoming a lifestyle blogger is a more lucrative career than ever.
Imagine you could make money by doing what you love and sharing it with others. Well, you can! Starting a lifestyle blog can lead to unlimited opportunities- from free products, to free travel and ultimately, to a lot of money.
Want to turn your posts into profit!
Sign up below & receive my customizable email templates to start pitching brands with- for FREE!
It all starts with starting a blog!
How to start a lifestyle blog in 2024?
Every year, someone claims that ‘blogging is dead’ – and yet year after year that proves to be the complete opposite of the truth. Blogging is most definitely still alive and kicking – and a lucrative, sustainable way to build a brand that will make you money. Starting a lifestyle blog in 2024 is a great idea!
Lifestyle blogging is still around, but it has taken on a totally different form.
Lifestyle bloggers are not writing short, personal updates about their own lives anymore, but rather creating in-depth, detailed blog posts to help their audience. Successful lifestyle blogs now are “reader-focused.”
How to make money with a lifestyle blog?
Bloggers monetize their blogs in many different ways – typically a combination of advertising, affiliate marketing, sponsored posts, selling digital products and/ or providing services. Bloggers who work hard and focus on monetizing their blogs often earn much more money from blogging than they could ever hope to earn in traditional jobs.
There are over 89,000 Google searches per second. Roughly 409 million internet users read about 20 billion blog pages monthly. It’s an ever growing industry. In 2021, vloggers reached more Americans aged 18–34 than any TV network. So, blogging just keeps getting better and better. It’s no longer a simple online diary, but rather your ticket to a fulfilling career, incredible opportunities and huge amounts of self-development and personal growth!
Related Posts:
- Want To Start A Blog And Make Money? FREE EBOOK!
- FREE email templates to start reaching out to brands with!
- How To Create A Rate Card As An Influencer
So, let’s get you on your way to starting a lifestyle blog TODAY!
Before diving into the world of blogging, it’s essential to define your niche and target audience.
1. Choosing A Blog Niche
“Niching down” allows you to focus on specific topics within your chosen theme, positioning yourself as an authority in your field. Whether you’re drawn to fashion blogs, food blogs, or fitness blogs, narrowing your focus enhances your blog’s appeal and SEO potential.
A blog niche is like the North Star guiding your blogging journey through the universe that is the internet of the internet. It’s the specific topic or subject area around which your blog revolves. When starting a lifestyle blog, it’s important to think about your niche.
In simpler terms a blog niche sets the tone, defines the atmosphere, and gives your guests (readers) a clear idea of what to expect when they step through the virtual door of your blog.
There’s tons of different lifestyle blog niche topics for you to chose from – some of the most popular being food blogs, a fashion blog, health and wellness blogs.
Pick something you are passionate about and start writing! It’s also important to do a little bit of market research to make sure that niche is profitable, if you are planning to blog as a business too.
2. Forming Your Blog And Brand Identity
Your blog name serves as the cornerstone of your brand identity, reflecting your personality and the topics you cover. Aim for a name that is memorable, relevant, and easy to spell. Consider leveraging tools like NameCheap to secure a domain name that aligns with your blog’s theme and resonates with your audience.
3. Selecting the Right Blogging Platform
Choosing the appropriate blogging platform is crucial for laying the foundation of your blog. While platforms like Blogger offer simplicity and ease of use, WordPress stands out as the preferred choice for serious bloggers. Opting for the self-hosted WordPress.org version provides unparalleled flexibility, customization options, and scalability for your blog.
In essence, selecting a blog niche is more than just picking a topic—it’s about carving out your digital footprint, building meaningful connections, and leaving a lasting impact in the vast expanse of the online world. So, choose wisely, stay true to your passions, and embark on your blogging journey with purpose and conviction.
Starting A Blog with WordPress And Bluehost
This next part of the guide is going to walk you through, step-by-step, how to start a lifestyle blog in WordPress, using Bluehost hosting. Once you complete these steps, you will have your very own blog up and running! How cool!
Creating a blog using WordPress can be intimidating if you are new to blogging.
I was so overwhelmed with google searches and information overload when I first thought of starting a blog, that I didn’t know where to begin!
In this post I’m going to show you how surprisingly simple starting a lifestyle blog is, and exactly how to start today (you can start making money today, too!)
In this step by step tutorial, I’m going to show you:
- How to use WordPress on Bluehost
- How to start a WordPress blog
- How to publish a WordPress blog
- How to change your username in WordPress (to make your site more secure)
- How to install and change a WordPress theme
- How to customize a WordPress theme
- How to start earning a profit from your blog
I’m also giving you a list of really useful tools to install and use to make your blog successful.
Step 1. Create an Account with Bluehost
The first step to creating a successful blog is to find a good hosting company.
Bluehost is one of the most established and well-known hosting brands on the internet. They host over 2 million WordPress sites and are excellent for beginners and starting websites because their platform is easy to use.
Click here to sign up for as little as $2.95/month (this discount deal is only available to my readers through my blog!).
You also get:
- Free domain name (the name of your website – you usually have to pay for this separately).
- Free email address.
- Bandwidth is unmetered – this means you don’t have to worry about your blog crashing if it suddenly gets a ton of traffic. Whether you get 5 people or 10,000 people visiting, you will be charged the same amount. That’s huge!
- Extensive library of training videos (Installing a WordPress theme, setting up mail, how to embed a video, etc…) Their videos make it easy for everyone to successfully build a website.
- Full refund if you cancel your account within 30 days. Or prorated refund for the remainder of your hosting term if you cancel Bluehost after 30 days.
- 24-hour technical support via chat, ticket or by phone.
What about starting a blog for free?
Simply put, if you want to be serious about blogging, DO NOT start a blog for free. Starting a lifestyle blog for free will really limit where you can go with it.
It’s very difficult to make money on a free blogging platform because you have limited control over it. The templates are also limited and very basic which will make you look like a novice. Visitors to your blog will see you as someone who blogs as a hobby instead of taking you seriously.

Companies also don’t like to work with blogs that are hosted on free platforms (sponsored posts, direct advertising, etc). It’s best to start blogging on a solid platform to avoid having to deal with unnecessary problems in the future. If you have a solid base to build your blog upon, you are golden!
Selecting a Plan and Registering Your Domain Name
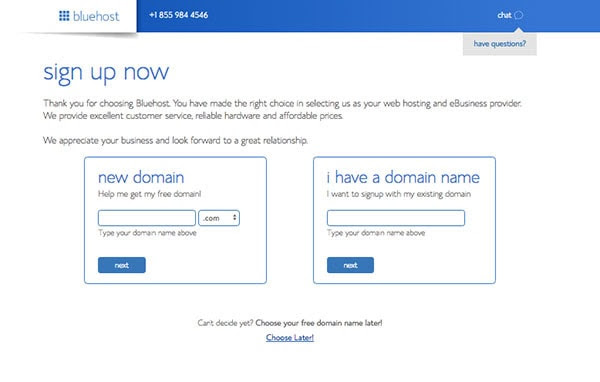
1. Create an Account
Go to bluehost and create an account.
Click on Get Started Now and you will be taken to the Select Your Plan page.

2. Selecting The Best Plan
This is where you decide how much you would like to spend on your hosting. Choose the $2.95 month plan for the best pricing.

3. Choosing Your Domain Name
The domain name is the name of your website. There are no additional charges to this since Bluehost gives it to you for free!
If you are having trouble coming up with a domain name, think of word combinations that represent what you will be blogging about.
The key is to not overthink here because you will drive yourself crazy! Remember that your goal is to create content so you can start making money blogging. I also recommend going with a .com over .net or .co since it’s more common and looks more professional.
Select the 36 month plan for the best pricing (for savings up to 63%). I know I’ve mentioned this a couple of times already but you must click on my link to get this deal.
If you decide to cancel your account after 12 months, Bluehost will refund you for the 24 months you haven’t used.
So no matter how you look at it, the cheaper monthly fee will always be better since you can cancel anytime, and get your money for the unused months back! Canceling is also super easy. Customer service is very helpful and nice too! There’s no jumping through hoops to get to your refund, it’s all done in a very straight forward manner.
You can uncheck all the other options for now since you technically don’t need them.
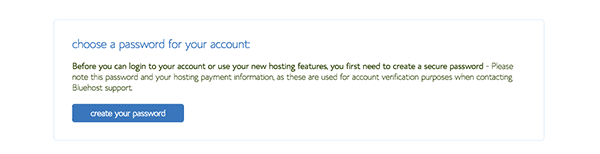
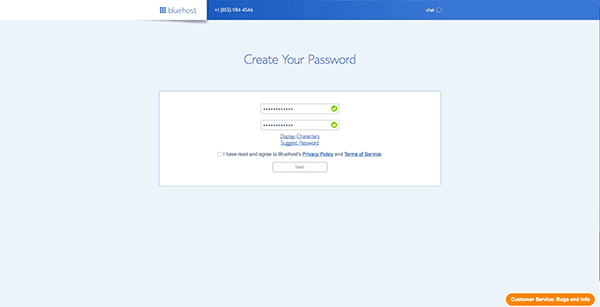
After choosing your plan, enter your payment information and click submit.
Create a password and, congratulations! You are now a live blogger!
You can now access your Bluehost account which will automatically take you to the WordPress installation process.
2. Installing WordPress In Bluehost
Before we dive into this, let me quickly explain the difference between Bluehost, WordPress, plugins and themes.
Since some of you are new at this, understanding what a hosting company is versus a blogging platform versus plugins and themes can be super confusing. I know it since I’ve been there!
Bluehost is where your blog is going to live. Think of Bluehost as an apartment complex where you are renting a space. That’s where your blog is going to live and stay for as long as you want to keep it there.
WordPress is a blogging platform. It’s basically a blank space that you fill with your writing and images, just like the walls of your apartment.
A WordPress theme is the style of your blog, your own personal architect/interior designer! This is where you pick the colors and the layout of your blog.
Plugins are like furniture and ornaments in that they make your room more useful and prettier. If you want a subscription box to your blog page, that would be a plugin you would have to add.
Now let’s install WordPress!
- Log in and in the Welcome page, click on Log in to WordPress.
- Next you will be asked about the kind of site you would like to set up – business or personal. That’s totally up to you or you can skip this step and click on I don’t need help.
- The next page is Pick A Theme That Inspires You. Don’t sit on this for too long as you will be able to change your theme later.

I find that it’s better to pick a random one (the ones offered are FREE), write a couple of posts and change it afterward. The reason for this is because it’s hard to know what your blog will exactly look like without any content in it.
Most bloggers (if not all!) will go through several themes before settling on one they like. It took me almost four years and five complete redesigns before I felt truly satisfied with the esthetics of my blog. Even now I constantly find ways to make it better and more user friendly!


How To Use WordPress On Bluehost And Publish A Post
Now that you are set up with WordPress, it’s time to log in and launch your blog!

Now that you are inside WordPress, click on Posts and Add New to create your very first post.

As you can see, there are a lot of functions you can use within a post, but there are a few important ones you should know about.
Add media button
This is where you can add images and videos to your posts. Click on the button and you will be taken to another window where you can upload your content.
Add a link
Highlight the words you would like to link and click on the chain to add the url.
Publish Immediately
This is great because you can schedule your posts to go live on a specific date. I use this with every single one of my posts since I usually have about a month’s worth of content pre-shot and written. Click Edit and choose a publishing date.
Preview.
This shows you what your WordPress blog post is going to look like.
Save Draft.
The most important button as far as I’m concerned. Get used to saving your drafts as often as you can in case you accidentally close your window, get booted out of WordPress or something crashes and ends your connection. The last thing you want is to lose hours of hard work and see it vanish before your eyes, like it never existed!
Text shows you the HTML of your page.
For example, if you wanted to add a banner to your page, you would click on text and add the html code there so that it comes up as an image on the visual side.
Edit button
Edit button is to change the url of your post. I ONLY recommend changing the url BEFORE the post is published. Changing it after can cause 404 errors and you could lose traffic from sites that were linking to that specific page. Changing the url is good for titles that are too long. For example, if you title your post Best Comfort Shoes For Women And Men Over The Age Of 65, by default the url is going to look something like www.yourblogname.com/best-comfort-shoes-women-men-over-age-65. That’s too long! Google doesn’t like long urls, so you could rename it www.yourblogname.com/best-comfort-shoes-for-seniors.
Paragraph
Paragraph has a drop down menu where you can find H1 to H6 tags which are important to include in a post for seo purposes.
And there you have it. You are minutes away from publishing your first piece of content!
Click the green Publish button when your post is ready to go live.
If you accidentally publish your post while in the midst of creating it (happens to me sometimes), no worries! Just go to Satus and set it to Draft, or click Edit where it says Published, and schedule to publish at a later date.
If you would like more information on how to set up a WordPress website, check out WPBeginner. You will find a wealth of information and tons of tutorials, all WordPress related.
Keep reading as I explain how you can change your username in WordPress, change and install a new theme, and how to customize a theme. I’m also give you a list of useful tools for starting a lifestyle blog and create a successful blog.
How To Change You Username In WordPress
If your username is the default username in WordPress, it’s a good idea to change it.
Most hackers are aware of this so when they hack into accounts they use the default admin username to access them.
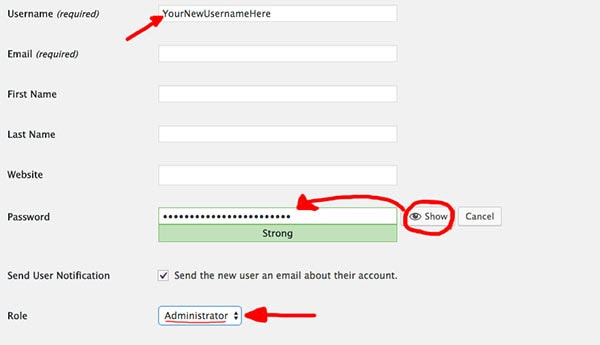
First, log in to your WordPress account and under Users, click Add New.

- Add your new username under Username. As I previously mentioned, you don’t have to come up with some crazy complicated username that you may not be able to remember later. Anything new is better than the default admin.
- Where the password is, click on Show so you can copy, paste and save it somewhere safe. This password is different than the one you were originally given so make sure to write it down and save it somewhere safe because we are about to delete the admin user.
- Under Role, change it to Administrator.
Click on Add New User and that’s it. Just make sure you have the new username and password saved somewhere!
Now you will need to log out of your account and log back in with your new username and password.
- Log back into WordPress with your new username and password.
- Go to Users -> All users
- Find Admin and delete it.
That’s it, you are done. Now your blog is twice as safe!
Changing Your Theme From Inside WordPress
Every now and then you may feel like your blog needs a makeover.
As your blog takes shape, you might decide that you want to change its style or add certain features that your current theme doesn’t support.
You can start by looking through the FREE themes available in the WordPress Themes section of your dashboard, under Appearance -> Themes.
These are great as a starting point since you can try as many as you want for FREE!

Here you can browse through the free themes available.
Using your cursor, hover over the design you like and click on Live Preview. This will show you what your blog will look like if you choose this theme. If you are happy with what you see, go ahead and click on Activate.
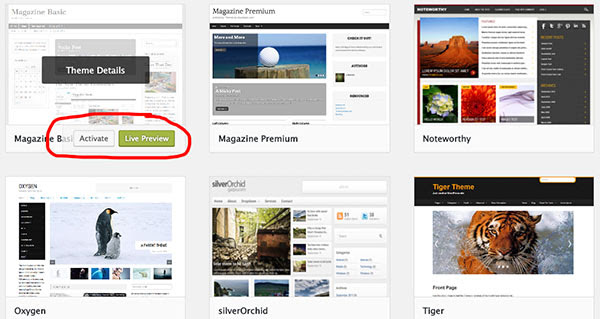
You can easily go back and forth between templates by simply clicking on Activate.
Installing A WordPress Theme That’s Imported
If you decide to import a theme, make sure that it comes from a reliable source. WordPress does NOT recommend you import FREE themes unless they are listed here, in the Official WordPress.org Themes Directory.
I used a FREE theme for the first couple of years of blogging but eventually moved on to something that offered more features and customization options.
I use Elegant Themes to build my website, and the websites of my students. Bloggers love these themes! Their templates are stunning and offer lots of different functions. The other advantage of is that you get special deals – amazing deals – after your first purchase. You never have to pay full price again.
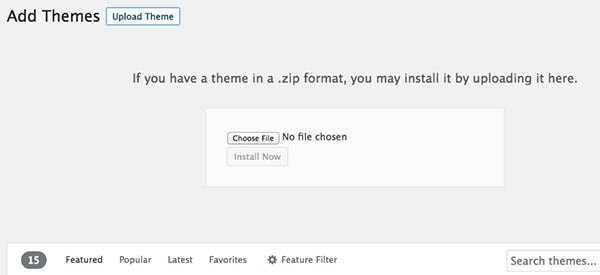
Importing A Theme
In your WordPress Dashboard, go to:
Appearance -> Themes -> Add New (the button is at the top of the page, above the themes).
Next to Add Themes, click on the Upload Themes button.

Click on Choose File and upload the ZIP file (the zip file will be inside the folder you have downloaded after purchasing the theme). Click on Install Now and click on Activate.
How To Customize A WordPress Theme
Now that you have a theme picked, you can play around with the font sizes, colors, menu and other features.
To customize your theme, go to your WordPress dashboard and click on Appearance -> Customize.
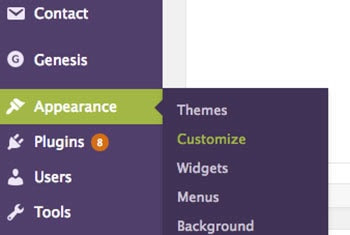
As you can see, I’m using the Brunch Pro Theme which is actually a child theme paired with the Genesis framework.
* WHAT IS A CHILD THEME?
A child theme is a WordPress theme that inherits its functionality from another WordPress theme -> the parent theme. Child themes are often used when you want to customize or tweak an existing WordPress theme without losing the ability to upgrade that theme.
From here you can make all the changes you desire to give your blog the look you have in mind. Every time you click on something you will see a preview on the right side of the screen. So say for example I change the text color from black to pink, I would see the text in pink on the right side.
Once you are happy with the changes, click the green Published button.
Additional Tools To Create A Successful Blog
Now that you know how to set up a blog on WordPress, here are a few additional tools I recommend checking out. You won’t need all of these right away so I suggest you bookmark this page and come back to it later, when it’s time to do some upgrading.
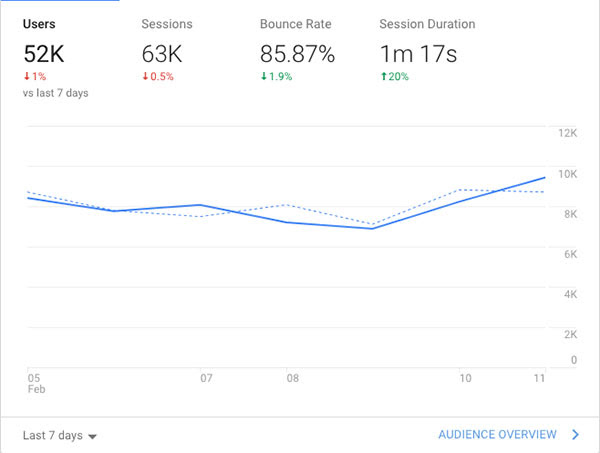
3. Google Analytics
You have published a few posts and now it’s time to see where the traffic is coming from.
Is it coming from organic Google searches or from social media channels like Twitter and Facebook? Or better yet, one of your posts was shared by a big site like Buzzfeed and you are getting a sudden spike in traffic.
First of all, how do you find out that Buzzfeed is sharing your content and which one of your post has gone viral?
That’s exactly what Google Analytics is for. It’s a very powerful FREE web analytics service that shows you where your visitors are from, how long they stay on your bog, which one of your post is the most popular and how your blog is being found.
When you are starting a lifestyle blog, installing Google Analytics should be a priority since you need to know what your visitors like about your blog in order to become successful at blogging.
Free WordPress Plugins
Here are more great (and free) WordPress plugins that will help improve your new blog!
Autoptimize:
Autoptimize is a game-changer when it comes to speeding up your blog. This plugin does wonders by minimizing, aggregating, and caching scripts, ultimately making your site load faster. This is important for both the user experience and SEO.
Akismet Anti-Spam:
Next up, we’ve got Akismet Anti-Spam, the unsung hero of comment sections everywhere. Spammy comments clutter up your site—Akismet filters them out, leaving your comment section clean.
UpdraftPlus:
It is extremely important to back up your blog. You never know what can happen, and I’ve run into a few horror moments myself! UpdraftPlus keeps your site backed up in case of emergency.
Rank Math:
SEO—the holy grail of blogging success. Rank Math not only helps you optimize your content for keywords and key phrases but also takes care of sitemaps and redirects when you need it.
Lazy Load – WP Rocket:
Last but not least, we have Lazy Load by WP Rocket—a must-have for any image-heavy blog. This plugin loads your images as your readers scroll, ensuring that your site remains lightning-fast no matter how many pictures you put on it.
Yoast SEO Plugin: Must Have
This is the FREE tool you should absolutely install as soon as you have created your WordPress blog is the Yoast SEO plugin.
SEO (search engine optimization) is basically writing content that’s optimized for organic searches. This means that in order for people to find your posts, you will need to rank high on searches in Google, Bing and other search engines. One way to help your posts gain traction is to focus on seo by adding keywords to your high quality content.
Then Yoast can help you create a sitemap, set up meta titles, shorten you urls, and give you pointers on the content of each of your posts.
There are even colored dots showing you what needs work (red) and what looks good (green).

4. Start an email list/ newsletter
Did you see that Facebook’s stock recently plummeted? It’s so important that you have control over your work and who follows you. If you’re just relying on social media, it’s time to start an email list.
Once your blog takes off you will want to connect with your readers by sending them weekly newsletters (my traffic always spikes when I send out a newsletter because I have over 10,000 subscribers) or inform them on new products you are selling. If you want to make money as a blogger, it’s essential to have a strong email list!
Your loyal followers will want to know what you are up to and are more likely to purchase something from you than a random visitor to your site. I have three locations for my signup boxes:
No matter the size of your blog or how long you’ve been blogging, you need an email list. It’s a great way to grow your traffic, find the right and targeted (so important) followers, sell products, make money through affiliate sales, and establish trust and a connection with your readers. I can’t stress enough the importance of creating a connection.
Let’s say you have page views. Tons of them. Great! Now, how are they coming back? Better yet.. how are they going to (hopefully, eventually) buy from you? If you don’t have a mailing list you can’t do that. This is a great way to contact someone directly and talk to them. I personally use Convertkit and highly recommend it. It’s what I’ve been using for the past three years. Over that time I’ve grown my list from 0 to now over 40,000 subscribers.
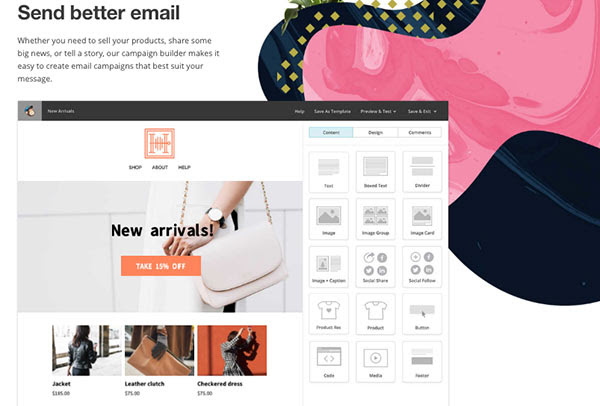
Mailchimp
For the first three years of my blogging career I used Mailchimp and was very happy with it. The reason being that Mailchimp is FREE to use – 100% FREE – for up to 2,000 subscribers! It’s also very easy to set up since they have tons of beautiful pre-made templates that only need your content added before they can be sent out.
Crafting Compelling Content and Monetizing Your Blog
Successful lifestyle bloggers go on to blog full time, and replace (and duplicate) a full time income from their blog alone. There are many lifestyle bloggers earning 5-6 figures from their blog per year. One of the most lucrative ways to monetize a lifestyle blog is through affiliate marketing, so I would definitely start your research there!
1. Developing Engaging Blog Content
Creating compelling blog content is the lifeblood of your online presence. Experiment with different writing styles, multimedia elements, and post formats to see what grabs your audience’s attention.
Focus on creating content that is reader-focused, and is optimized for reader intent. Write a blog post that provides value to your readers. This is really the key to starting a lifestyle blog!
Remember to leverage SEO best practices to enhance your blog’s visibility and reach in search engine results.
2. Exploring Monetization Strategies
Monetizing your blog opens up a world of earning potential and financial independence. Explore various monetization avenues, including affiliate marketing, sponsored content, digital product sales, and memberships.
Find the right affiliate marketing programs to join for your niche. For example, fashion bloggers do well on LTK/Reward Style. When you are starting a lifestyle blog, research affiliate marketing programs in your niche, and start creating content that solves your readers problems!
By diversifying your revenue streams, you can maximize your blog’s profitability and sustainability over time.
3. Building Community and Engagement
Nurturing a community around your blog is essential for fostering lasting relationships with your audience. Engage with your readers through comments, social media platforms, and email newsletters.
You are starting a lifestyle blog for a reason. You want to reach people, help people, or you want people to buy from you, right?
Encourage feedback, foster meaningful conversations, and prioritize authenticity in your interactions.
Successful Lifestyle Blogs To Be Inspired By
Here are some of the most influential voices and lifestyle bloggers shaping trends and inspiring millions across the digital landscape.
THE EVERYGIRL
Main Topics: Fashion, Beauty, Food, Home, Finance, Wellness, Living, Culture
Monthly Organic Traffic Estimate: 736,762
The Everygirl isn’t just a blog; it’s a publication of empowerment for modern women navigating life’s most pressing choices and challenges. From career advice to culinary delights, The Everygirl offers inspiration and practical wisdom for all aspects of living.
A BEAUTIFUL MESS
Main Topics: Crafts, Home Decor, Recipes, Style
Monthly Organic Traffic Estimate: 290,498
With a delightful mix of DIY projects, home decor ideas, and mouthwatering recipes, Elsie Larson and Emma Chapman invite readers to embrace the beauty of imperfection.
JULIE BLANNER
Main Topics: Recipes, Home and DIY, Entertaining
Monthly Organic Traffic Estimate: 285,639
Julie Blanner’s blog is a celebration of life’s simple pleasures and heartfelt hospitality. With irresistible and easy recipes, home decor tips, and all of the entertaining ideas, Julie invites readers to savor every moment with style and grace (and inspire you to do the same!)
CAMILLE STYLES
Main Topics: Food, Entertaining, Design, Beauty, Wellness
Monthly Organic Traffic Estimate: 273,631
My personal favorite blog, Camille Styles embodies the art of living well and embracing everyday life int he best way. She shares the best recipes, inspiring design concepts, and overall inspiration on beauty, wellness, and culinary delights. She does a great job showcasing all of this on Instagram as well! When I was just starting a lifestyle blog, she was a huge inspiration.
These lifestyle blogs are huge inspirations to me personally, and probably to all of your reading this too!
Click here for free access to my FREE, customizable Canva Templates Library to help you create images for your brand! Images will go a long way when you are starting a lifestyle blog!
You should always create pins for Pinterest and design eye catching graphics for other social media platforms such as Facebook, Instagram and Twitter. This was essential in growing my blog traffic, and I attribute most of my success to learning how to properly use Canva – and then how to properly use pinterest.
Read more about how to use Pinterest to grow your blog traffic, here!
More Posts On Blogging:
- How To Start A Travel Blog And Make Money
- How To Monetize A Travel Blog
- SEO For Beginners: Get Seen And Rank On Google
- How To Start An Anonymous Blog
- What Is A Personal Blog? And How To Start One

Email templates for brand collaborations
— Start Today!
Sign up below to receive FREE customizable email templates where I share the simple strategies to get gigs!
[hfcm id=”3″]
Starting a lifestyle blog in 2024 is a journey that could be lifechanging, and I’m excited for you that you have decided to take this step!


Loved the article – so many helpful insights! It still amazes me that you can make a living off your passions 🙂 The EveryGirl is def one of my favorite lifestyle blogs – I read it every day!